
Crust glazes, an interesting observation…
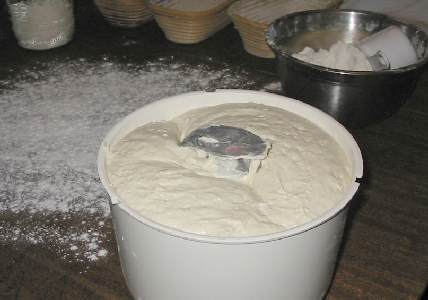
Today I baked up some sourdough basic white using my San Francisco starter # 2. It has improved immensely since I first tried it. It now has a nice tang and robust flavor and….it behaved wonderfully! The dough bulk fermented on schedule… and proofed a bit on the long side, like I would expect a SF starter to do. I am very happy with the results. However, I wanted to experiment with glazes and I found out that they may affect not only the crust but the bread shape as well.
Here is a picture of the San Francisco starter bubbling away:

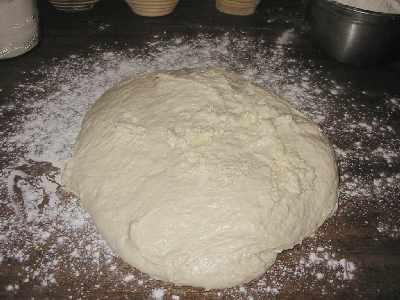
Here is the dough after bulk fermentation, I tried to catch it just before it was completely proofed:
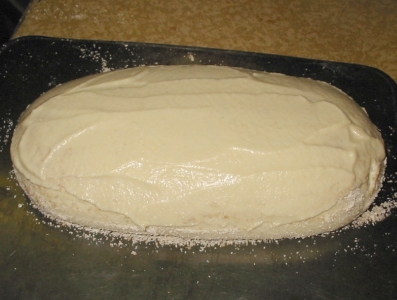
Here is the dough poured out:
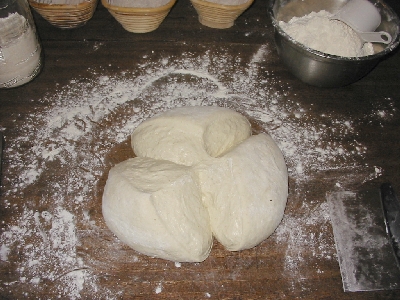
Here is the dough cut into three pieces which weighed just shy of two pounds each:
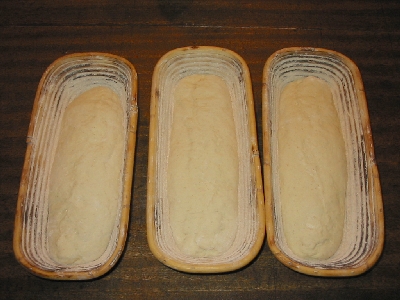
Shaped and put to rest in the bannetons:
I let them sit out for 30 minutes and then put into the refrigerator overnight.
Next morning at 6:00 am I took the first one out and then staggered the other two.
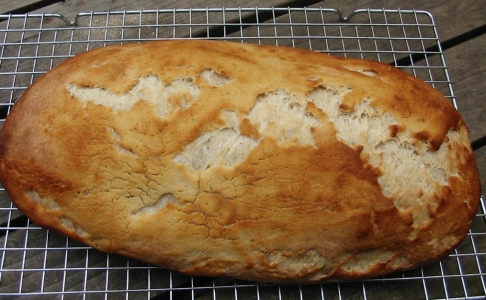
Proofed and slashed:
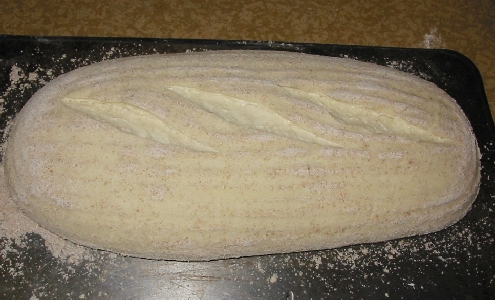
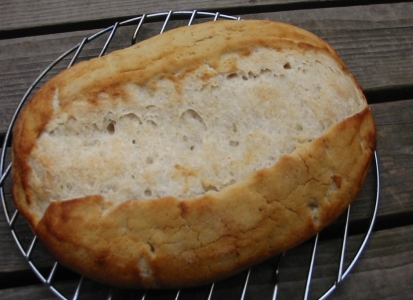
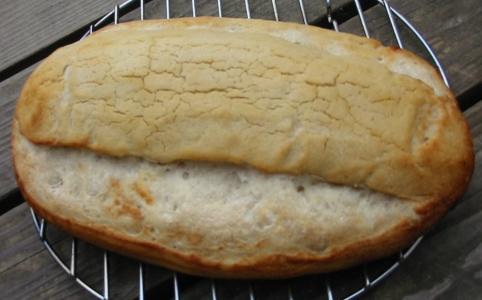
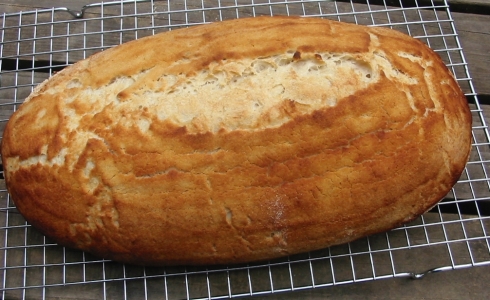
I did a different glaze on two loaves and left one of the loaves plain. The loaf on the left was an egg glaze: One egg beaten with 1 Tablespoon of water. The one in the middle was left plain. The one on the right was a cornstarch glaze: 1 teaspoon of cornstarch mixed into 1/2 cup cold water in a small pan and then simmered until thickened.

It hard for you to see in the picture, but both breads that were glazed spread apart more than the plain loaf. The plain loaf had a greater oven spring. The egg glazed loaf spread more than the other two. The cornstarch glaze gave a nice finish and color to the crust.
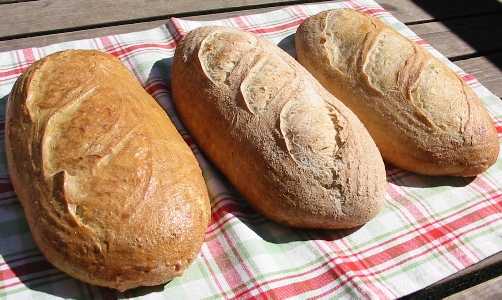
I glazed the loaf with the egg glaze after it was about halfway finished and then again before it was finished. I glazed the cornstarch glazed loaf before it went into the oven and again halfway through. I think that perhaps the glaze kept the crust moist longer than the plain loaf and allowed the loaf to spread more. The crust with no glaze was able to form a crust that was stiffer and helped it to spring more. These are only speculations. If you have any experience in glazes and have noticed an effect on the crust or dough, I would like to hear it. It never occured to me that a glaze might cause spreading of a loaf. I think maybe glazing at the end of baking would take care of this phenomena.
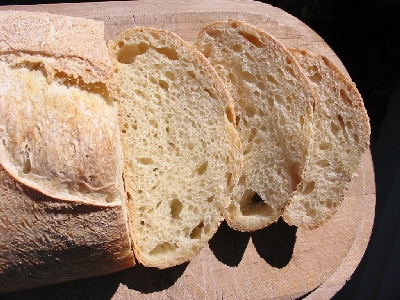
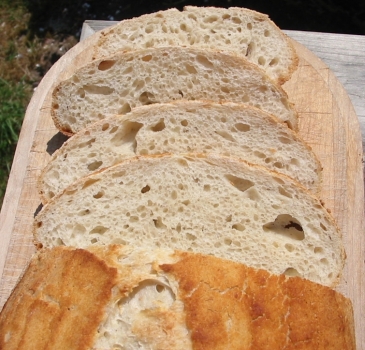
Here is the crumb of the unglazed loaf:
This is a really good tasting starter at this point. I think it has much promise.
I am sure there will be more San Francisco starter experiments to come…
Silky Soft Whole Wheat Loaves…yep Sourdough
Today I am working on a soft sourdough bread recipe. I have condensed milk in the dough plus more oil. I wanted a soft, part wheat bread for making sandwiches. I am also going to give a demonstration on slashing. The amount of dough made up three loaves at about 2lbs 5 oz each (they were the same weight within tenths of an oz) and I shaped them into batards. I proofed them in the marine canvas couche I have which I love, it is so terrific! The dough feels soft to work with, and has taken longer to bulk ferment and to proof. Here is the dough after warming up, after being taken from the refrigerator this morning:

Here are the loaves going into their couche bed:

Now I want to share with you what I have learned about basic slashing. Here is a picture showing the different common kinds of slashing and thedirection the dough will spread.

I thought I would go ahead and show you how the slashing affects the baked loaves with today’s bake.
This is the first loaf, I slashed it diagonally:


The loaf got a great oven spring but was smaller than the other loaves because I was pushing to get it into the oven before the other loaves were overproofed. It was underproofed. However you can see how the slashes affect the bread.
When you use a cloche, you have to realize that unless you have an oven big enough to bake three or four loaves at once, you will have to put in the first loaf slightly underproofed in the hopes that the last loaf in won’t be too overproofed.
Here is the second loaf, it was slashed somewhat vertically:


This loaf was proofed just right and the slashes are mostly vertical which make it look more professional. Think vertical, not only do the slashes spread just right, it looks great too.
Here is the third loaf, this loaf had one long vertical cut:


The long vertical slash very often gives a very nice looking loaf and open crumb. Be careful not to slash to deeply though or it will fall apart.
This bread smelled so good while baking in the oven! I had to turn the oven down 25 degrees because of the milk in the bread.


This recipe is called Western Wheat Sourdough. It will eventually find it’s way into the Special Recipes folder. The Special Recipes folder is a collection of my recipes which are available for sale on my website at ~( http://www.northwestsourdough.com/specialrecipes.html ). Many of them have been the subjects of this blog. The recipes are ready for printout and the folder is added to when I develop new recipes. Thankyou to all of you who subscribe to this folder. I hope you are enjoying baking as much as I do!
San Francisco …again!
I tried the San Francisco starter number one again, it was the one that tasted great last time but just didn’t have the oomph left after proofing too long (my fault). I waited a couple more days, feeding regularly and fed in the morning before starting the preferment in the evening.Then I proceeded with the Two Night Super Sour recipe. That entails a preferment one evening, and then building up the dough in stages the next day, shaping, putting in the fridge overnight, and then warming up and baking on the third day. The starter performed wonderfully this time with terrific proofing and no slacking. The dough felt silky soft and springy. I am really happy with how it turned out this time. Here is the first loaf:


Oops! A little underproofed! It is hard to slash in this pattern and not have it crack, I am working on it though. Any hints on slashing this pattern are welcome. I don’t slash too deep but just a surface slash because when I slashed deeper the loaf would separate and spread along the slashes. I may be slashing too far across the loaf. Hmmm….

Here is the crumb:

Here is the next loaf:

Here is the third loaf:

Here are the two together, the first one was almost completely devoured when I was taking pictures of these two:

Here is the crumb from loaf two:

Nice soft crumb and tangy taste, a great bake!
Sourdough Experiments San Francisco Style…
I’ve been experimenting with two new starters that were sent to me. Both San Francisco starters. The first starter has a stronger aroma and I tried baking with it first, but I had to leave when it needed to be baked, so I put it back into the fridge and waited until the next day and it was too far gone, no oomph left. It also did not raise too well, so I will feed the starter and wait a bit longer to see if it will come up to snuff. I did bake the bread anyway and even though the flatness and color were disappointing, the flavor was really wow! So since it was my fault that it flopped, I will give it another try.
The second starter I baked with today, this is also a new (to me) starter and I may have to let it ferment a bit longer to develop the flavor. Once sourdough starters are dried, they need a bit of time to recover the bacteria that is responsible for the flavor, the yeast recovers more quickly, which is why you can bake a nice looking loaf, and wonder where the “tang” is. That is what happened to today’s bake. I will show you the steps I went through to produce this San Francisco Bread. I started with a preferment early in the morning. After six hours it looked like this:

I then added the rest of the ingredients, mixed, autolysed, and then processed the dough for three more minutes. I then poured the dough into an upside down cake saver tupperware:

Then the dough bulk fermented for four more hours and looked like this:

I shaped the loaves into boules, they were about 1 lb 13 oz each:

Then into the proofing baskets:

After 2.5 hours, ready to bake:

Turn out the dough and….slash:

(That’s one of Bill’s handcrafted lames, beautiful isn’t it?).
Then first loaf:

Second loaf:

Third loaf:

I glazed all of the loaves with melted butter. Here are all three:

A finer crumb with lower hydration:

I am going to try these two starters again with the Two night Super Sour Recipe and see how they come out! Keep tuned….
Back to Basics – White Sourdough
After working on sourdough experiments for a while, I have decided to go back to basics and do up a batch of Basic White Sourdough. This is the sourdough recipe that is on the website at: http://www.northwestsourdough.com/recipes.html I made up a batch in the afternoon and let it preferment for about six hours. I then shaped the loaves and put the dough into the proofing bannetons:

I made two larger loaves at 2+ lbs and 1 smaller loaf at 1.5 lbs. I then let the bannetons sit out for one hour because the dough was slow proofing this time, maybe because it has been around 60 degrees here. Then they were put into the refrigerator for their sleep overnight. I took out the loaves staggered one at a time next morning. It took about 2.5 hours to warm up and proof. I have been having problems with my new stone being too hot so I moved up the stone a bit and turned down the oven a little. The bread came out really well and has a nice sour tang. The crumb is wonderfully soft yet springy.

As you can see the color is wonderful!


Here is the crumb:

As you can see by the pictures which I took outside, I still have an overclouded sky. The picures look a bit greyed out on an overcast day. However, the bread is terrific!
So when you get tired of experimenting and you just want to see some great sourdough…do up the basic…you can’t go wrong!
Pane Teresa !!!!
I’ve done up a batch of Pane Teresa. It is such a wonderful bread!! You look amazed in the oven when after five minutes, it starts blowing up like a balloon! It is just too awesome and exciting for words, you have to experience it. I made up the batch and did my metric measurements so I could update the recipe. This is the star recipe in the Special Recipes folder available at my website. It was named by the Northwest Sourdough forum by Bill who won that contest for naming the bread. I took a couple of pictures of it as I put it into the oven flat and it just started popping. I have more pictures, but they came out badly so can’t post them, too blurry etc. Here is the first one, my oven and stone had pies baked on them so overlook the mess.
Here is the bread right after being put into the oven:

After five minutes:

I made a little .exe file to show you the loaf popping in the oven. The slideshow will not loop and just hit “esc” to shut off the last frame. Like I said, the pics were taken through the oven window so they are fuzzy:
Click here to see Pane Teresa:>>> Pane Teresa Popping in the oven
Closeup Pics of the finished loaves:


You will not believe the crumb….it is awesome!!!
Here it is…

And…

If you like large holes in your crumb, you can have them by baking this bread. It is only partly in the hydration, you get the holes by following the recipe, it’s different.
Wheat Nubbins Loaves
Here is the bread I started in the earlier post. It is a lower hydration dough with sifted Whole Wheat flour, some sifted Rye flour and some boiled cracked wheat nubbins. I expect the crumb to be finer and I also put in the salt earlier this time to slow down the fermentation because my Northwest Starter is just bulk fermenting too fast for what I want at only 3- 4 hours and I want it more like six hours for that great long fermentation flavor. I also added melted butter and malt syrup for flavor and moistness. I am hoping to wet the crust and roll the dough in the part of the wheat that was sifted out, (the branny part) before slashing and baking. The dough is proofing right now in its finished shape and I will be baking it in about two more hours more or less. Or I might glaze the bread this time for something new to do. I will get back with you.
The bread turned out great! We have overcast skies today, so I had a hard time taking a picture to show you how wheaty and colorful the loaves look. In the pictures they look washed out. Maybe tomorrow we will see the sun and I can take a couple more pics. Anyway, I was also baking a roast in the oven, (yes, it isn’t hot here on the coast 🙂 ) I tried to put the first loaf in with the roast turned sideways, I didn’t have a skinny peel so the cookie sheet I was using wouldn’t fit into the oven enough for me to plop my dough onto the stone. I tried jerking it fast anyway, and it fell partway off the stone and I had to try to pull it up onto the stone, it gasped a little and I made it but….gee…not fair.
I did decide to cover the top in the sifted bran particles of the flour I used to make the bread. I spritzed the loaves and coated on the branny stuff. Then I slashed and baked. Here is the boule loaf:

Here are all three loaves:

Here is how the crumb looks on the boule:

The sifted Whole Wheat flour makes a great crumb. The loaves were just slightly over 2 lbs each. I made the recipe using the motherdough and a one night style technique so there was a preferment mixed together in the late evening, and a buildup of the dough in the morning, bulk ferment, and then baking. It is easier to tell when the loaves are proofed when they are not warming up from being in the refrigerator overnight. This recipe turned out great and I will probably write it up and put it into the Special Recipes folder when I get a chance. I am behind because I have not written up the Nickle Rye Recipe yet.
My daugters bake sourdough…
I was kicked out of the kitchen last week! My two eldest daughters wanted their turn at baking up some sourdough. First Rochelle baked up some of the Coastal loaf, she likes that recipe and made it before. She is still a little nervous around wet dough, so she added more flour and made a lower hydration version. It turned out delcious, but she was a little disappointed that it didn’t have a larger holey crumb. I told her not to worry if her fingers got a little sticky, but she didn’t like working with wet dough. Here are her loaves:

She did not take a picture of the crumb, which is disappointing, because even though the crumb was not very holey, it was a very nice looking crumb.
Next my daughter Natalie made up some of her favorite One Night Sourdough. She also added the 1/2 cup of Rye and got a really nice sour flavor with her bread. She made three two pound loaves that came out very well. She also kneaded in more flour as she shaped the bread but was more comfortable with sticky dough and handled it pretty well. Here are her loaves:

She was proud of the crumb and took a picture:

The bread is almost all eaten up by now, so I have a batch of a new recipe coming along today. It is a lower hydration dough with sifted Whole Wheat flour, some sifted Rye flour and some boiled cracked wheat nubbins.
Basic White with my own Dutch Crunch
I made up some Basic White Sourdough and decided to make my own Dutch Crunch topping because all of the ones available have commercial yeast and I wanted to use my starter. So I made up just over 6 lbs of dough and substituted 1/2 cup rye flour for the added enzymatic activity (I’ve been having good results with adding the small amount of rye). I did the bulk fermentation and shaping yesterday and put the loaves into the refrigerator overnight. I also made some Dutch Crunch topping using sourdough starter.
Here is what is looked like after I mixed it up:
Here is the recipe for the Ductch Crunch Sourdough Style:
2 Tablespoons active starter
1 Cup rice flour (I ground my own brown rice)
1 Tablespoon light Malt syrup
2 Tablespoon Oil
1/2 teaspoon salt
1/2 cup water
Stir all together in a bowl, cover loosely with plastic wrap and let sit at room temperature until next day’s baking. It should be frothy with bubbles when ready to use. Then wash the top of the loaf with some water using a pastry brush, and spread on the Dutch Crunch as thick as you would like it.
With my first two one pound small loaves, I tried slashing the bread, but I had made it is a higher hydration dough and with the crunch topping, it did not get a good oven spring it just spread with the extra weight of the topping.
These are the pound loaves that spread too much from slashing:
Notice how nice the topping looks. I needed to brown it more so I left in the next loaves longer than I would have otherwise.
With my two large loaves, weighing about 2 lbs each, I did not slash at all and they cracked wherever they felt like it and it looks a lot nicer. My recommendation after doing this topping is to use a lower hydration dough when trying out this Dutch Crunch.
Here is how the larger loaves came out:
See how much nicer it looks browned? The crunch topping is really delicious especially with the hint of malt in there.
Here is the second 2 pound loaf:
Here is a picture of the crumb:
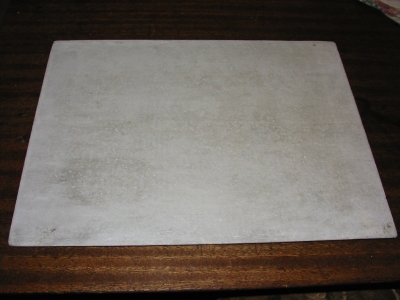
My Fibrament Baking Stone
I got a new baking stone. My old stone was from an unused kiln and it was crescent shaped, so I had a difficult time putting the longer loaves on it. I looked up different stone and decided to get a Fibrament stone.
They make a size that fits my oven great and optimizes the space I have. I bought a 15″ x 20″ x 3/4″ stone for 66.00 which includes shipping. I have used it several times, and I can tell you one thing for sure…it bakes great bread!
The only thing that I needed to learn about it, is that the thermal conductivity is greater than with firebrick, so I had to turn down my oven. I was doing the first five minutes of the bake at 500F degrees, but I now have to do the first five minutes of a bake at 450F degrees. The 500F degrees was just too hot and I was getting black spots on the bottoms of the loaves. I think the heat transfer is really good for these stones. Moving it higher up in my oven solved the problem of the stone getting too hot and it works perfect now, I couldn’t be happier.
I have baked several batches of bread now and I can say that I have really liked the Fibrament stone so far. Another fact about the Fibrament stone is the fact that you can never put it into the sink and scrub it because you are never supposed to wipe it with water.
Here is a picture of the stone:
Find your stone here: