I love One Night Sourdough, especially when you forgot to start some sourdough earlier in the day and you just want to bake the next day anyway! You start a sponge later in the evening and let it sit overnight, mix up the rest next morning, bulk ferment, shape, proof and bake.So anyway that happened to me yesterday, I need some fresh sourdough by today and I missed getting it started earlier in the day yesterday, so I started the sponge last night and will be baking today. Here is what the sponge looks like in the morning:
This is what the gluten looked like after the bulk ferment:
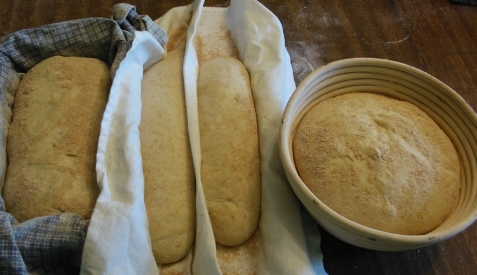
I mixed the rest of the ingredients into the sponge at 7:30 am this morning. By 10:45 it had doubled.I poured out the dough on the floured table and shaped up three loaves of varying weights.
I made about 5.5 pounds of dough altogether. The loaves proofed about 2.5 -3 hours.
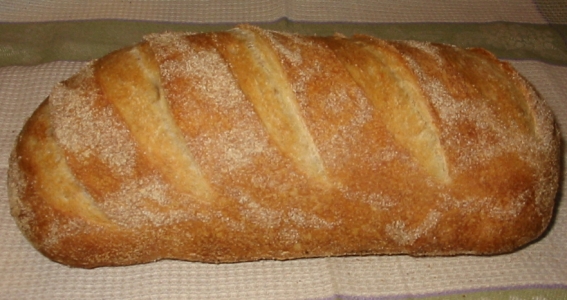
Here is what I got:
All three:
They are still cooling so will show the crumb later. I like the convenience of the one night sourdough especially if you don’t have room in the refrigerator for the separate loaves. I got a new baking stone too….I will have to tell you about it.
Well I’ve been busy but here is the pic of the crumb I promised:
This turned out to be a finer, moister crumb, I put in about 2/3 cup more flour so I could make a sandwich style bread. I also melted shortning and added that instead of oil.
Yesterday I started a Basic White sourdough and decided to put in some Rye flour because I was doing sourdough reading and I read that in some bakeries in Europe, the bakers add a small amount of Rye flour to the dough to stimulate the fermentation and get a higher oven spring. So I thought I would try it. I used the basic recipe available for printout on my site: http://www.northwestsourdough.com/basicwhite.html
I added 1/2 cup of whole Rye flour instead of the same amount of white flour. The dough was tight and stretchy when I was mixing the dough. But after bulk fermentation, it felt soft and somewhat slack. So I was wondering what would happen.
Well next day I baked up the three loaves and I got a great oven spring. The bread is really very good. It came out sour, crusty, light with an open crust. What more could you ask?
Here is a couple of pictures:
Yesterday I started a Pumpernickel Rye. Today I baked. I flavored the Pumpernickel with Strong coffee and molasses and gave it some texture with cracked rye berries.
I started early so I could have a nice bulk ferment and still get it into the refrigerator for a long cool ferment. This bread tastes SUPER! Of course it doesn’t have the loft you come to expect with a white sourdough, but that’s what’s nice, the difference!
Here is the dough being shaped into loaves:
This recipe made almost 7.5 lbs of dough!
I made up three small one pound banneton loaves and two larger 1.75 lb loaves.
The first loaf went into the oven and I wasn’t happy with the outcome, the loaf cracked down the side and seemed underproofed. It may have been slightly underproofed but when the second loaf came out the same way, I decided the inner dough wasn’t able to get through the slashes. Here are the first two loaves:
So I remembered Aussie Bill had a little experiment with slashing and I took his advice to slash lengthwise. I was really happy with the results. Here is one of the one pound loaves slashed lengthwise:
Look how nice it turned out! So I also slashed the other loaves that way:
Don’t they look terrific? Well they taste terrific too. My kidlets gobbled up two of the loaves already with cream cheese and we are going to finish off more for dinner with eggsalad sandwiches with Pumpernickel Rye. Already today I started a basic with some added rye for an experiment, I will let you know what happens! I will be posting this recipe in the Special Recipe folder as soon as I can.
Today I made up some Sourdough Bay Bread. I actually started yesterday and baked today. I started at 10:15 am in the morning and made up a preferment. I proofed this until the afternoon when I added the rest of the ingredients and then did the bulk ferment until the evening.
Here is the dough after mixing:
Here it is after the bulk fermentation:
Here is what the gluten development looks like after the ferment:
I then shaped the loaves and put them in the bannetons. This recipe made 5 lbs 12 oz of dough.
Then I shaped the loaves and put them to sleep in the refrigerator. I was shooting for a nice “sour” tang for this bread. I acheived it, it has a nice sour tang and it hasn’t even sat until later in the day for the sour to develop.
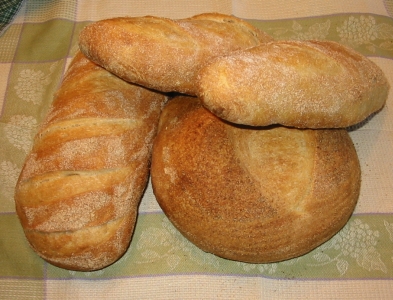
Here are the batard shaped loaves:
Here is the boule:
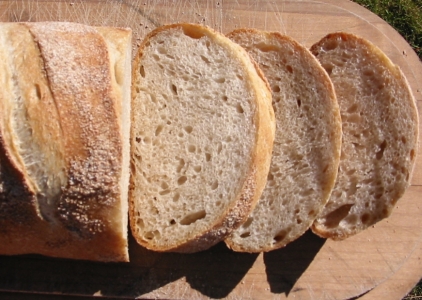
Here is the crumb from one of the batards:
I’ve decided to write this recipe up and offer it in my Special Recipes folder on my site. I also have decided to put together a small sourdough kit which I will offer besides the regular sourdough starters:
I’ve printed up some envelopes with the dried starter included and a card with instructions and the waffle recipe and a proofing cloth. I thought this would be a fun idea for a gift.
I mentioned with the last post that my daughter, Rochelle, age 23, wanted to try to bake up my Coastal Loaf. We ended baking on the same day, because my Rye bread came out of the refrigerator early in the morning already shaped in loaves, and hers came out in bulk to be warmed up, shaped and then proofed again and baked. So I baked early and she baked later. She was surprised after the first fermentation, before it went into the refrigerator, at how sticky the dough was. She said, “How will I handle this?” I showed her how to handle the sticky dough and she did great.Here are her loaves:
Here was her favorite one:
Here is the crumb:
She had a bit of trouble figuring out when they were proofed enough to bake as I had to leave and she was on her own. I feel she could have left them proof just a little longer, but it was hot and they could have easily overproofed. She said the recipe was easy, it just took longer than she thought it was going to.She gave one of the loaves to her boyfriend, and now, there may be a marriage on the horizon! You never know what can be accomplished by sharing a sourdough loaf!
I did up Jeffrey Hamelman’s Rye from his book, “Bread”. I used the Rye,Wheat Recipe found on page 195. I did add caraway to my dough which he did not have in this particular recipe. I also did not use any commercial yeast which he did. I made up the starter per his instructions, let it ripen overnight, then made up the rest of the dough the next day. I then let it proof and made up the loaves, which I then refrigerated overnight. This is how the dough looked after bulk fermentation:
I used my new bannetons to proof the loaves and here they are:
I made up double the recipe and ended up with almost seven pounds of dough. Each loaf was just a bit over 1.5 lbs. In the morning they were proofed very well and had doubled. It was hard to bring them up to room temperature without overproofing them, and two of them were slightly overproofed. However I am extremely happy with how they turned out!
Here are the loaves finished:
The crumb is terrific! The taste is wonderfully tangy, chewy,with a crisp crust, and a hint of caraway. Yummmy!!!
Here is the crumb:
An altogether successful day! Whats more, my daughter is baking my Coastal loaf using the new bannetons and they are in the process of being baked right now! So I will have more to tell you about her loaves later.
I am trying the Two Night Sourdough again with the extra added whole wheat flour, and I am doing it a one nighter instead. I have the loaves on the table proofing and almost ready to start baking. I started the recipe last night and let the sponge set overnight. This morning I took out the sponge and instead of building up the dough during several stages, I added the rest of the ingredients all at once. I did the bulk fermentation for only four hours and it was doubled! Then I added the salt, which would have slowed down the fermentation if I would have added it sooner. It also makes a coarser crumb when you add it sooner in the process, and that is terrific if you are doing a San Francisco style, but I am not aiming for that this time. The dough is incredibly spongy and bubbly. There is an great difference over last time when I added the flour and water in stages (Remember it overproofed last time).I am making one 2 lb boule, two 15 oz small french style loaves and one 1 lb.2 oz. loaf in a bread pan, which I will turn out on the stone. I made 5 lb 7 oz of dough altogether.
Here are the formed loaves proofing:
Here are the first two small loaves out of the oven:
Here is the batard loaf:
Isn’t there a terrific difference in color compared to the last batch which was overfermented?
The boule loaf I had to put into the refrigerator to keep it from proofing too fast as the loaves all wanted to be ready at the same time. I baked the smaller loaves first, the batard second, and then the boule.
Here is the boule:
You will notice that on the left side it looks lopsided. There is a reason for that:
Blowout! After putting it into the fridge to keep it from proofing too fast, I didn’t let it warm up enough before baking….so it had a blowout!
Here are all of the loaves together:
Here is the crumb of the batard:
This was a lower hydration dough, so I didn’t expect larger holes. The crumb has a nice soft chewiness. The bread is very good and tasty, just a little sour… but…it lacks the knock your socks off flavor of my overproofed batch. So…back to to the drawing board!
Last night I started a Two Night Sourdough which is my San Francisco Style Sourdough recipe. However, when I took the sponge out this morning, I decided to wing my way into something different. I have some ground whole wheat flour that I sifted to take out the coarsest bran and I added a cup of the sifted flour. I set aside the branish flour to use for the proofing basket and the shaping. After adding the sifted flour, I also added more bread flour. Then I let the sponge proof again. In the afternoon, I added the rest of the ingredients, and let it proof again. This recipe is built up over time with more flour and ingredients added as you go along. In the end, the result is a nice sour bread with plenty of rise because the whole thing was never overproofed but built up.
This evening after the proofing was done, I took out the branish flour and poured out the dough. Then I kneaded it a little, shaped the loaves with a coating of the branny stuff and put the loaves to bed in the fridge. We will see how they come out tomorrow. With the added wheat flour, I think the bread will have a nice punch to it.
I am making two bread pan loaves and a boule. To be continued….
Eating Crow instead:
Well today I am eating crow…so to speak. My addition of the whole wheat in such a long fermented dough was my downfall or I should say the dough’s. After I built up the dough throughout the day, I smelled alcohol, and began to suspect that the dough was overfermenting. However, it was too late to fire up the oven and bake, so I went ahead and put the bread in the fridge overnight. I think if I would have baked that night instead of waiting until next morning, the bread may have come out better. Anyway, the dough was a pale color and had little oven spring, evidence of overfermenting during bulk fermentation, or so I have been learning. Here are the pictures of the bread:
First loaf out of the oven:
Notice the flat, whitish look.
Here are the second and third loaf:
The third loaf was the boule and I baked it at a higher temperature longer just to get it to color up.
Here is a picture of the crumb:
This is such a great lesson for me because it drove home how overfermentation during the first proofing affects the dough. I have baked using this same recipe (except without the whole wheat) and schedule several times and never had this happen, so I am assuming the addition of the whole wheat sped up the fermentation too much. There is a plus to the whole flop, and that is the bread tastes super delicious. I had several members of my family ignore how the bread looks and say, this is so good you HAVE to make it again. It has a tangy, full bodied, wheaty flavor and wonderful smell. So…..I will make this recipe again, and still use the addition of the whole wheat, however, I will do this as a one night sourdough instead of a two night and see what happens!
I brought out my Nancy Silverton’s book, Breads from La Brea Bakery, and decided to give her Basic White bread recipe a go. It has been a while since I first tried that recipe and one of the first sourdough recipes I had used. I have been working with higher hydration doughs than her basic recipe, so it was a stretch for me to keep adding the flour to the mix. I also had to mix longer and add a significant amount more salt.
I was cleaning up my files on my computer, and I came across some of my very earliest sourdough bread pictures. I had to laugh! I remembered back to being a newbie in sourdough baking, and all of the flops I had until my breakthrough loaf. I thought I would share some of the pictures with you , so that those of you who are newbies to sourdough baking, can see that we all bake those flops in the beginning. It is in persisting that we get the breakthrough loaf. Here are some of my very first sourdough trials: